Feedstuff sampling
Sampling from the gate of a silo
- Several subsamples (size about 50 - 200 g) must be taken.
- These are combined, thoroughly mixed, and then separated again into several homogeneous subsamples.
- One or more subsamples constitute the final sample, which is sent for analysis (0.5 to 1 kg).
- The base area of the silo must be divided into 4 to 9 fields. A partial sample must be taken from each field. The following figure shows the sampling grid for the base area or gate area of a silo (small silo on the left, large silo on the right).

- If the gate area is inhomogeneous (e.g. different layers, several types of forage in the case of sandwich silages), partial samples should be taken from each layer. When combining the subsamples to form the final sample, make sure that the quantitative proportions correspond to the situation in the silo stock.
Sampling of the TMR at the feed table
- Sampling (TMR) on the feed table must be done during or immediately after presentation of the ration.
When sampling after feed presentation, the feed table must be divided into 3 - 5 sections depending on its length. A partial sample (2 - 5 kg) must be taken from the middle of the sections. It is important that the sample is taken over the entire vertical (ô), as the components of a mixed ration tend to sediment (segregate). Taking subsamples only from the top of the ration can lead to significant errors, even if a large number of subsamples have been taken across the feed table (horizontal). Usually, the use of a shovel is suitable for taking such large subsamples. The final sample is drawn from the subsamples by means of a dividing cross, which is sent for analysis (0.5 to 1 kg).
Sampling Hay
- Take hay samples only after a storage period of 8 - 12 weeks
- When the round bale is open, leave out the edge layers. Take at least 5 individual samples from all layers from the outside to the inside.
- For opened square bales take from one side to other side at least 5 single samples
- If hay bales are closed, make two punctures with a borer stick from opposite sides centered to the core so that all layers are covered.


Water sampling
Requirement
- sterile bottle for microbiological examination
- (un)sterile bottle is sufficient for chemical examination
- send water samples as quick as possible and cooled to the laboratory
- sterile bottles are provided by our laboratory free of charge. Please feel free to order them from Mrs. Wolfram
Procedure
- remove seals and strainers
- discard about 1 liter of water
- at constant temperature filling of the chemical sample ((un)sterile bottle)
- flaming or disinfection of the sampling point
- Collection of the microbiological sample (sterile bottle)
Livestock water sampling
Please do not take the drinking water sample directly from the drinking basin, but from the discharge point beforehand. A sample from the drinking basin will falsify the results, as bacterial growth is favored by adhering saliva and feed residues.
Note
Drinking water samples may only be taken by accredited samplers. For drinking water sampling, please contact Ms. Wolfram.
Jacqueline Wolfram
Manager microbiology, veterinary diagnostics and foodstuff
technical manager LKS & LKV
deputy manager milk laboratory
+49 37206 87-187jacqueline.wolfram@lks-mbh.com
Soil sampling
Sampling instructions for the determination of the basic nutrients in soil
In addition to soil analysis in the laboratory, conscientious and representative sampling is fundamental for a meaningful test result. Sampling should be done every 3-6 years, depending on the intensity of use, befor mineral and organic fertilization.
The soil samples for Nmin-analysis could not used for the determination of the basic nutrients, the lime content and the micronutrients.
The sampling time should always be to the same season under similar conditions during the frost-free period. The field must be dry and walkable. The soil should not be too wet and not dried out, so that the sampling stick can penetrate to the required extraction depth and the sampling stick fills evenly.
To determine the basic nutrients (P, K, Mg), lime content (pH) and micronutrients, take soil samples from the depth of 0 - 20 cm on crop land and 0 - 10 cm on grassland (main rooting area).
Per field at least take one sample, big fields should be shared. The sampling grid should not be bigger then 10 ha. In the case of strong soil differences and different previous crops or different cultivation (especially organic fertilization), differentiated sampling should be carried out according to the area proportions.
Take the samples evenly on the area along a diagonal line or along a Zigzag line with ca. 20 punctures/sample for crop land and ca. 40 punctures/sample for grass land. Edge strips and headlands shall be excluded from sampling.
The sample stick had to be punctured the soil vertical, to be rotate and carefully pulled out (complete preservation of the sample in the sampling stick). The sample is to be transferred in a collection vessel, the single samples should be mixed and put in a plastic bag (ca. 300 g). Please close the bag securely and marke with a smudge-proof pencil. Per sample one seperate sample number must be assigned.
Please fill out the order form carefully.
Dr. David Tokarski
Probenannahme u. Attestierung
Manager sample acceptance and attestation/Consultant for soil fertility and plant nutrition+49 37206 87-194
david.tokarski@lks-mbh.com
Susanne Beer
Probenannahme u. Attestierung
deputy manager sample acceptance and attestation+49 37206 87-184
susanne.beer@lks-mbh.com
Sampling plant analysis
Sampling instructions for plant analysis
The following principles must be observed by taking samples for plant analyses:
- For every field resp. every part of the field one representiv sample is to be submitted. Untypically places should not be part of the sampling.
- At least should be taken 500 g plant material from different places of the field (at least 20) along a diagonal line or along a Zigzag line.
- The plants must be sent in without roots and pollution.
- The sampling should not carry out direct after fertilization.
| Plant species | Plant organ | Development stages (BBCH) |
|---|---|---|
| all grain species | entire overground plant | tillering to spike and panicle swells |
| Silo corn | middle leaves | 40 – 60 cm |
| middle leaves | panicle pushing | |
| cob leaves | bloom | |
| winter rape | just fully developed leaves | bud little (53) – bloom (64) |
| potato | just fully developed leaves | bud stade – tuber formation |
| sugar beet | just fully developed leaves | middle: June, end: June, July, August |
| fodder beet | leaf blade of just fully developed leaves | end: June, July |
| pea | entire overground plant | 30 – 40 cm, start of bloom |
| broad bean | entire overground plant | start of bloom |
| alfalfa | sprout from 1st growth | bud stade, start of bloom, bloom |
| red clover | sprout ca. 10 – 15 cm over the ground | bud stade, start of bloom, bloom |
| meadow and pasture grasses | sprout from 1st growth | start of bloom |
| linseed | entire upper third of sprout | budding - start of bloom |
| sunflower | upper fully developed leaves | start of bloom |
| Source based on: Umsetzung der Düngeverordnung; LfL 2007 | ||
Dr. David Tokarski
Probenannahme u. Attestierung
Manager sample acceptance and attestation/Consultant for soil fertility and plant nutrition+49 37206 87-194
david.tokarski@lks-mbh.com
Foodstuff sampling
Control of cleaning and disinfection
a) Contact plates - Control of cleaning and disinfection of surfaces
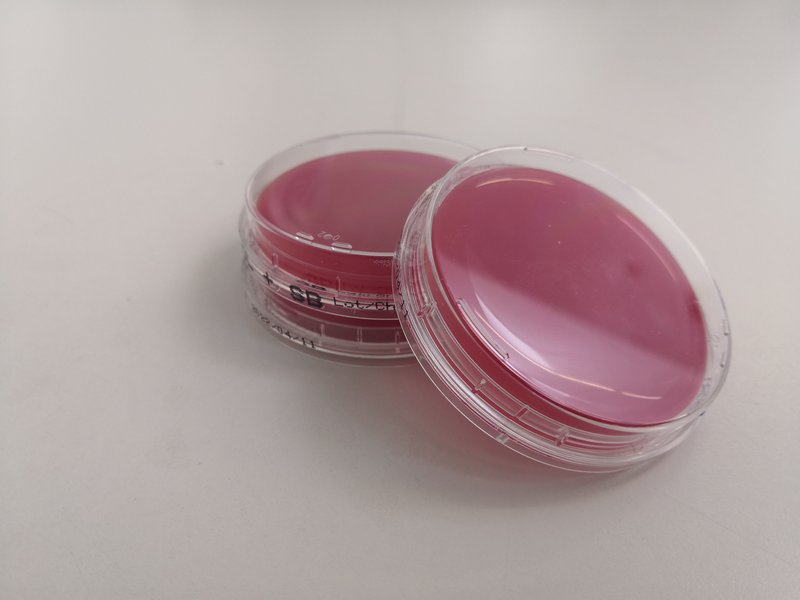 -> for the determination of the total germ count (ATTENTION! Please do not use swabs!)
-> Please store in the refrigerator until use
-> Use the order form - foodstuff: Process hygiene
- Cleaning and disinfecting of the sampling point
- Remove the lid of the contact plate; do not touch the inside
- Gently press the contact plate at the sampling surface
- Replace the lid and label it according to the sample number on the order form
- Note the sampling point on the order form
b) Swab samples
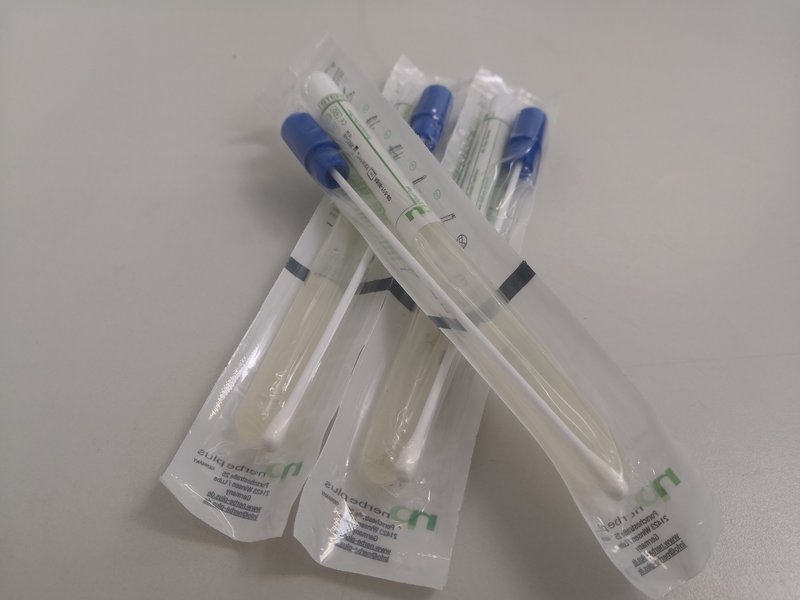 -> for determination of Salmonella, Listeria and other bacteria = "positive/negative" detection
-> use the order form - foodstuff: Process hygiene
-> Please take one swab for each parameter (Salmonella, Listeria, etc.)
- Cleaning and disinfection of sampling point
- Determine sampling point: for listeria e.g. drains, floor tiles, etc.
- Remove swab from packaging
- Roll the swab several times at the sampling point
- Put the swab into the tube and label it according to the sample number on the order form
- Note the sampling point on the order form
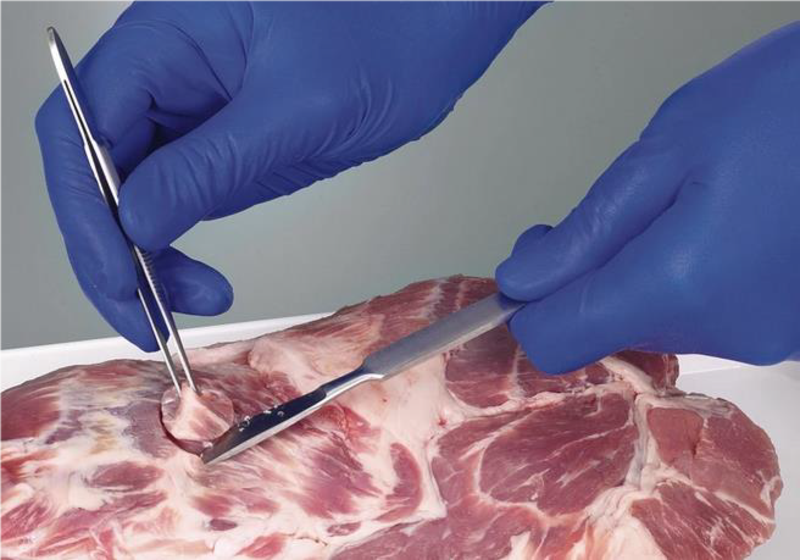
Collection of carcases samples
Sampling point
a) Cattle: Comb, lower chest, flank, haunch
b) Schaf, Ziege: Thinning, flank, underbreast, breast
c) Schwein: Back, cheek, leg (ham), belly
Sampling
-> Please take on each carcass from four points individual samples (5 cm² each)
-> use the order form - meat
- Wash and disinfect hands, put on gloves if necessary
- Have clean freezer bags or sterile pouches available
- Dip punch or knife, tweezers in alcohol and flame off
- Pierce punch at designated points and rotate, drill piece (rind with proportionate bacon/meat) about 0.5-0.8 cm thick hold with tweezers and cut off with knife OR cut out an appropriately sized piece with knife
- Place carcass sample in bag and label it
- Note the sampling point on the order form
- Before each further sampling: flame punch or knife, tweezers each time
Jacqueline Wolfram
Manager microbiology, veterinary diagnostics and foodstuff
technical manager LKS & LKV
deputy manager milk laboratory
+49 37206 87-187jacqueline.wolfram@lks-mbh.com

Sampling Pre-harvest-analysis grain as foodstuff
Sample instructions for Pre-harvest-analysis of grain
Grain, that should be placed on the market as a foodstuff, may according to VO 1881/2006 (Verordnung zur Festsetzung der Höchstgehalte für bestimmte Kontaminanten in Lebensmitteln) not exceed the level of lead and cadmium. With the pre-harvest-analysis can be assessed, whether an exceedance of the maximum level for foodstuff is to be expected. The sampling is possible from the dough stage (EC85). In this way, the producer fulfills his obligation for self-monitoring in accordance with foodstuff law.
The sampling could carry out from the farmer or from a commissioned person. Please note that complete grain ears must be cutted and sent in the laboratory. With single grain corns no intentional pre-harvest-analysis could take place.
The collective sample must be kept cool and sent in laboratory within 2 days. Togehter with the sample should for an definite allocation following informations delivered:
- Fruit species and variety
- Information on the traceability of the samples (field name, parcel, field number, field part)
- sampling date
- sampler
Raina Wein
Feedstuff and soil laboratory
technical-scientific manager+49 37206 87-198
raina.wein@lks-mbh.com
An representiv sampling is the basis to an professional analysis and for an meaningful analysis result. Therefore we give you on this website instructions and notes for an expertly sampling.


